
Valheim: 10 tips for starting out in the Viking survival game
Co-op Viking survival game Valheim is in Early Access, and players are plunging in to build forts, craft weapons, sail longships, explore the massive and mysterious open world, and do battle with creatures inspired by Norse mythology.
Whether you're playing with friends online or going it alone, Valheim can be a harsh and unforgiving survival sandbox. There's a helpful talking crow who will give you a good amount of guidance as you're just starting out, but the crow doesn't explain everything you need to know. You may need a bit more direction, and that's why we're here.
Here are 10 tips to make your first few days in Valheim easier. (We've also got a short separate guide about how to build a campfire inside your base—and avoid suffocating from the smoke.)
1. Destroy old buildings to harvest wood quickly
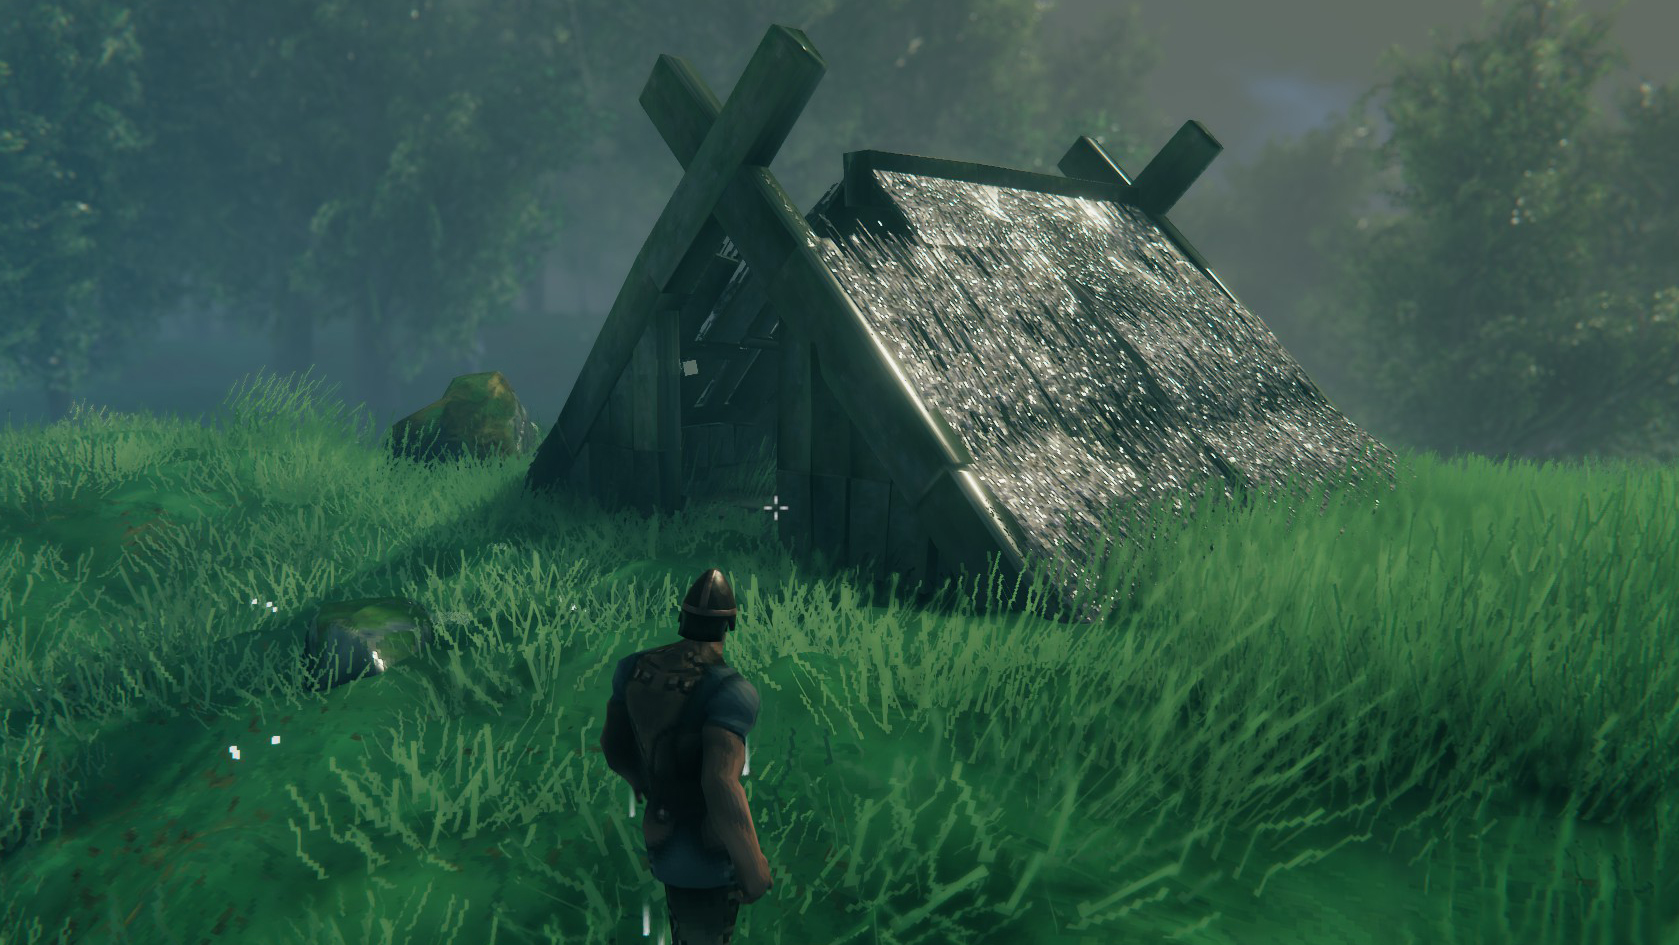
As you explore you'll sometimes come across small shacks and hovels in a state of disrepair. They're a great source of easy-to-gather wood, and in Valheim you're gonna be gathering wood a lot.
But don't bash the huts with a weapon! Instead, use your crafting hammer to create a workbench, drop it on the floor inside the shack, and then start destroying the building (middle-clicking the mouse while you're holding your hammer will destroy walls, floors, and roof pieces). Gather up all that free wood, then tear down your bench and move on. You can completely strip a building in a matter of seconds and walk away with tons of wood to use on your own projects.
Don't forget to look around inside these old buildings when you find them. Some have treasure chests with loot, and others have beehives that will give you a queen bee when destroyed, which you can use to build your own hive.
2. Upgrade your workbench by crafting a chopping block and tanning rack
There are two items in your crafting menu that are a bit misleading: the chopping block and the tanning rack. These items don't actually function—you can't use them for chopping wood or tanning leather, and that can be a little confusing. What they actually do is upgrade your workbench.
Crafting the chopping block and placing it near your workbench will upgrade your bench to level 2. The tanning rack will upgrade your workbench to level 3. This will allow you to upgrade your weapons, tools, and clothing to level 2 and 3 as well, giving your weapons more damage, clothing more protection, and so on.
3. There's no repair cost, so it's easy to keep your gear pristine
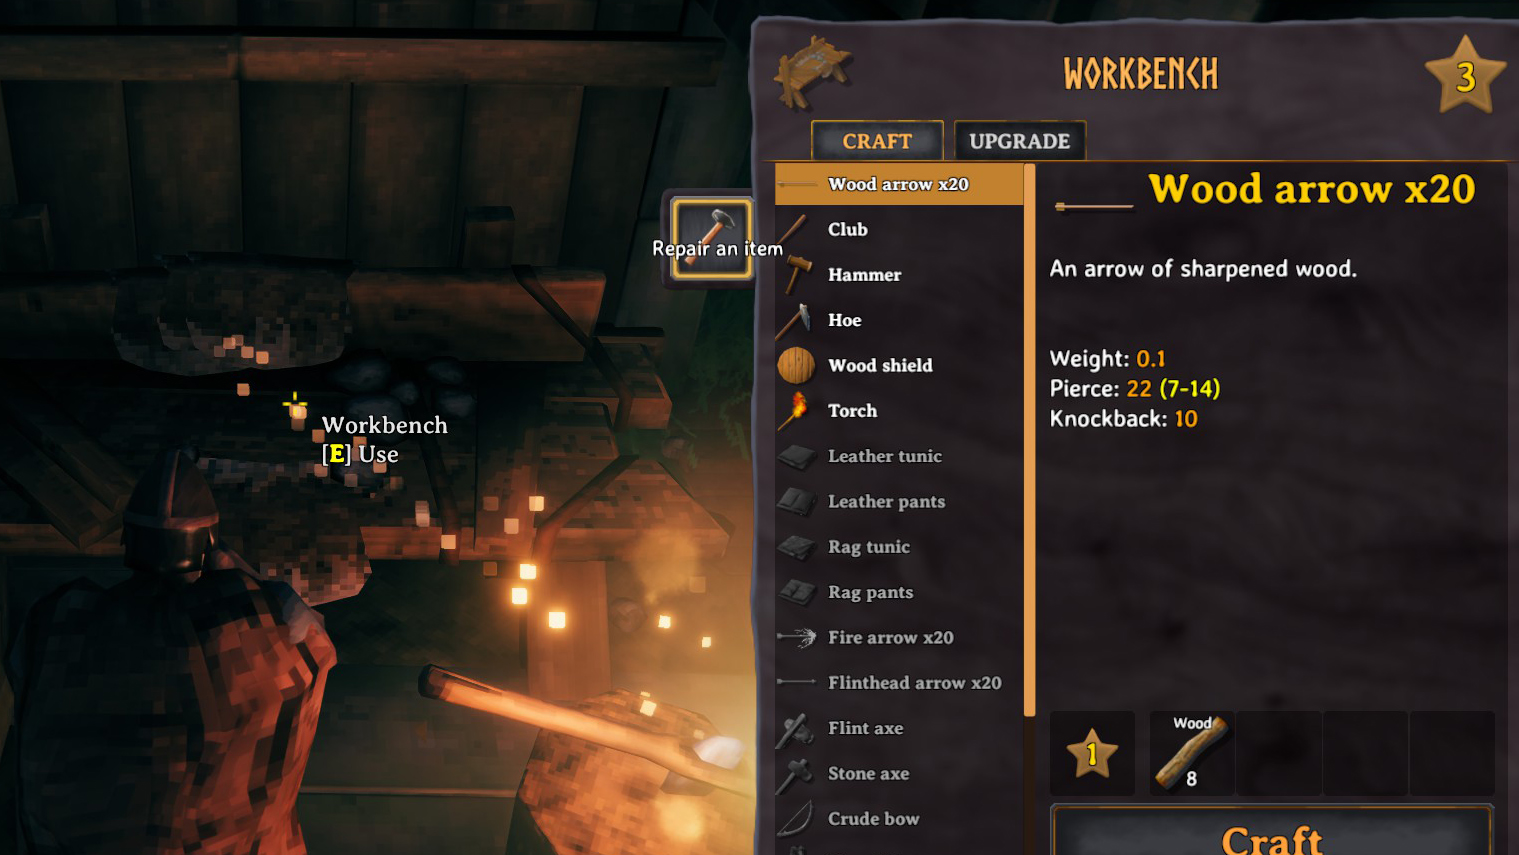
When standing at your workbench you'll see tabs for Craft and Upgrade. But to the left of the menu, there's a small square image of a hammer. That's your repair tool.
Unlike most crafting games, you can't select a specific item to repair. Clicking the repair hammer button will just cycle through each damaged item in your inventory and fix them one by one. There's no resource cost for repairs, though, so click away! Every time you visit your workbench you should hit the repair button until you've fixed all your gear.
4. Sail your raft with WASD
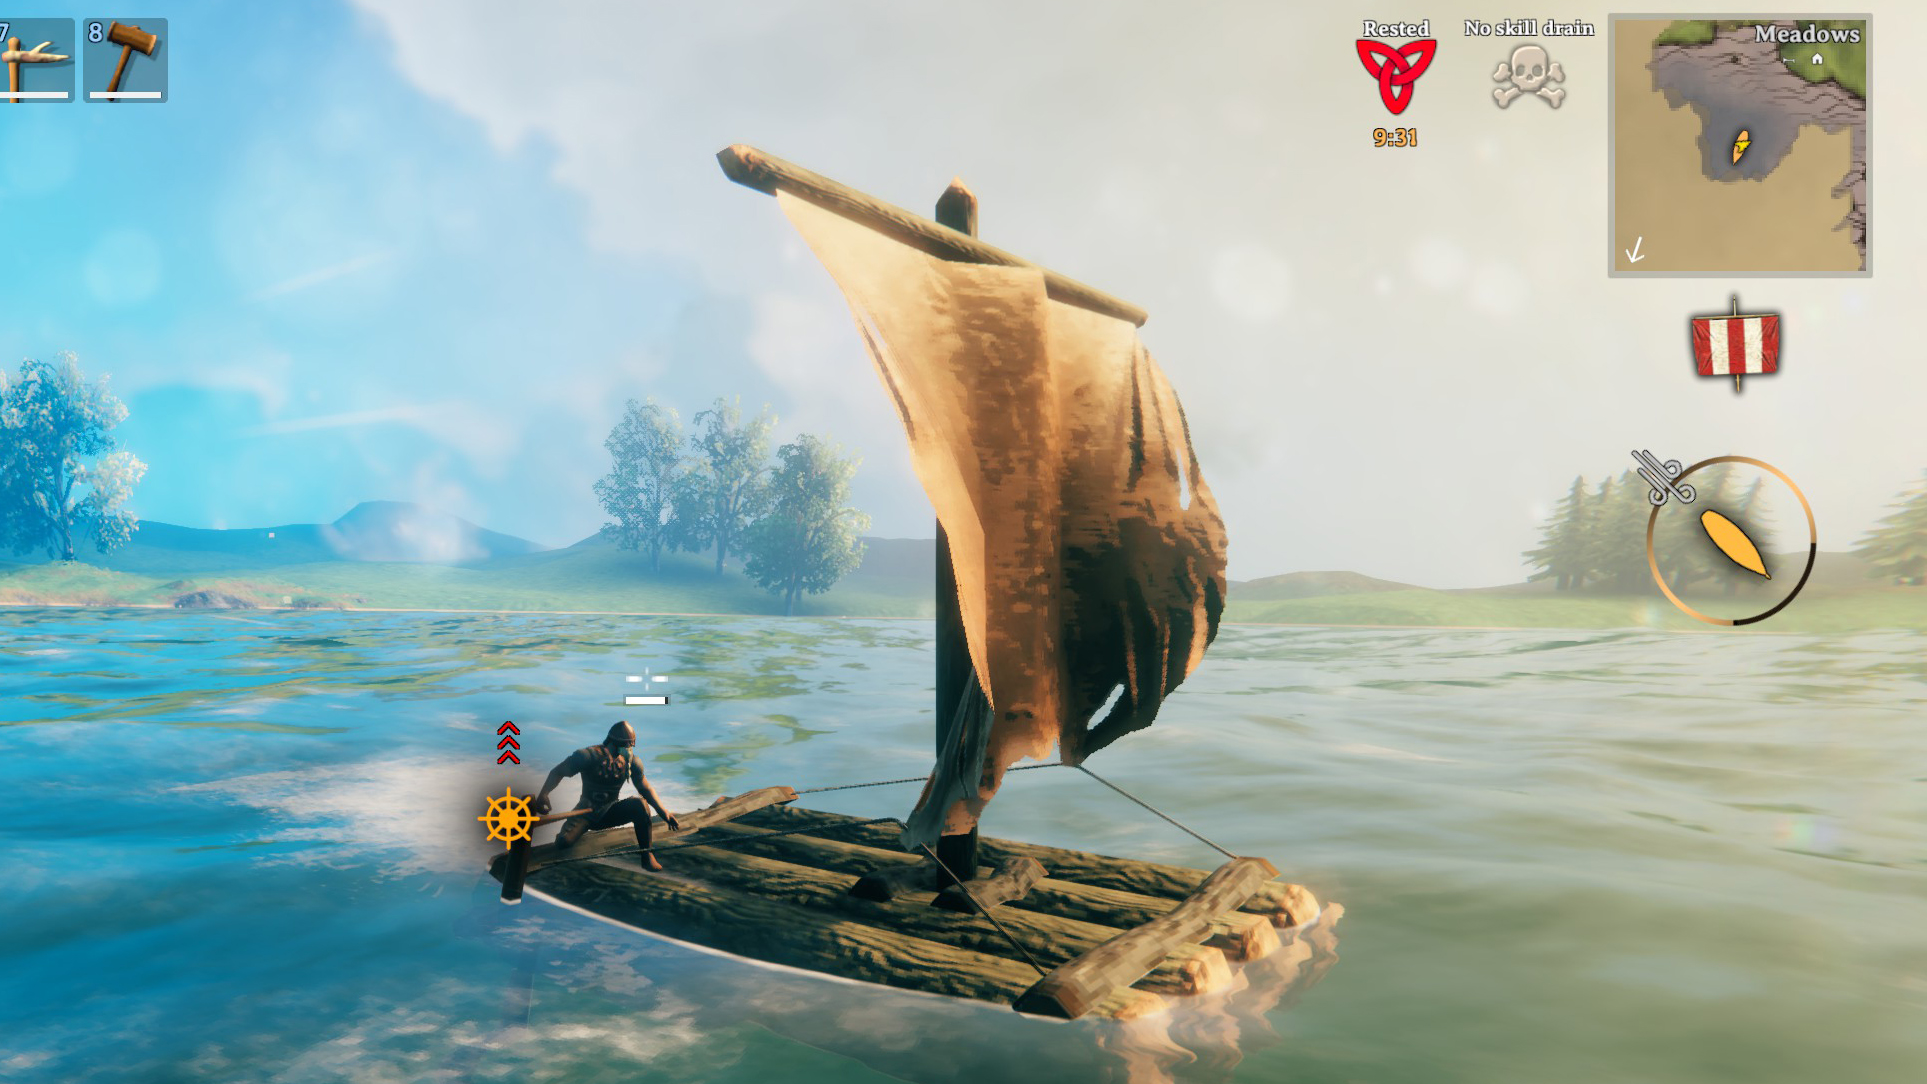
That sounds simple, but it wasn't immediately apparent how to sail my first raft, so here's how it works. Look for the prompt to use the rudder at the rear right corner of the raft, and press E. While holding the rudder, pressing W will take you through the three speeds: Slow (just using the rudder as a paddle), medium (the sail will be dropped halfway), and fast (the sail will be dropped all the way). Pressing S will cycle back down through the speeds. Turn the rudder with A and D. You'll turn much faster with the sail up rather than down.
You won't make progress if you're trying to sail straight into the wind, so keep an eye both on the little white arrow on your minimap (which shows wind direction) and the icons below the minimap, which indicate the direction your raft is pointing and where the wind is blowing from.
Also note there's a small ladder on the rear of the boat, on the opposite side of the rudder, which makes it easy to climb back on if you've fallen off. If you're a passenger, you can hold onto the mast by looking at it and clicking E when prompted.
5. Tame boars with mushrooms
You might encounter a rune stone that says you can befriend boars by feeding them roots of the earth. That means mushrooms, which are red and can be found on the forest floor.
The only success I've had with taming a boar was making one chase me into a pen I'd built from fencing, then closing a gate behind it. Then I'd select mushrooms from my inventory and left-click over the pen, which drops a mushroom inside. The boar will snack on the mushroom and you'll see little yellow hearts rising above it as its disposition toward you increases. It seems like a slow process—after a day or two of feedings I was only at 8% tame. But it's a start! If you collect multiple happy boars, they'll breed, giving you a local source of leather scraps.
6. Carry a weapon on your back with the R key
No real advantage to doing this, it's just kinda cool. You can carry a weapon, tool, or shield on your back by tapping the R key while you have the weapon in your hands. It just feels Viking-y.
7. You'll need to defeat the first boss to craft a pickaxe
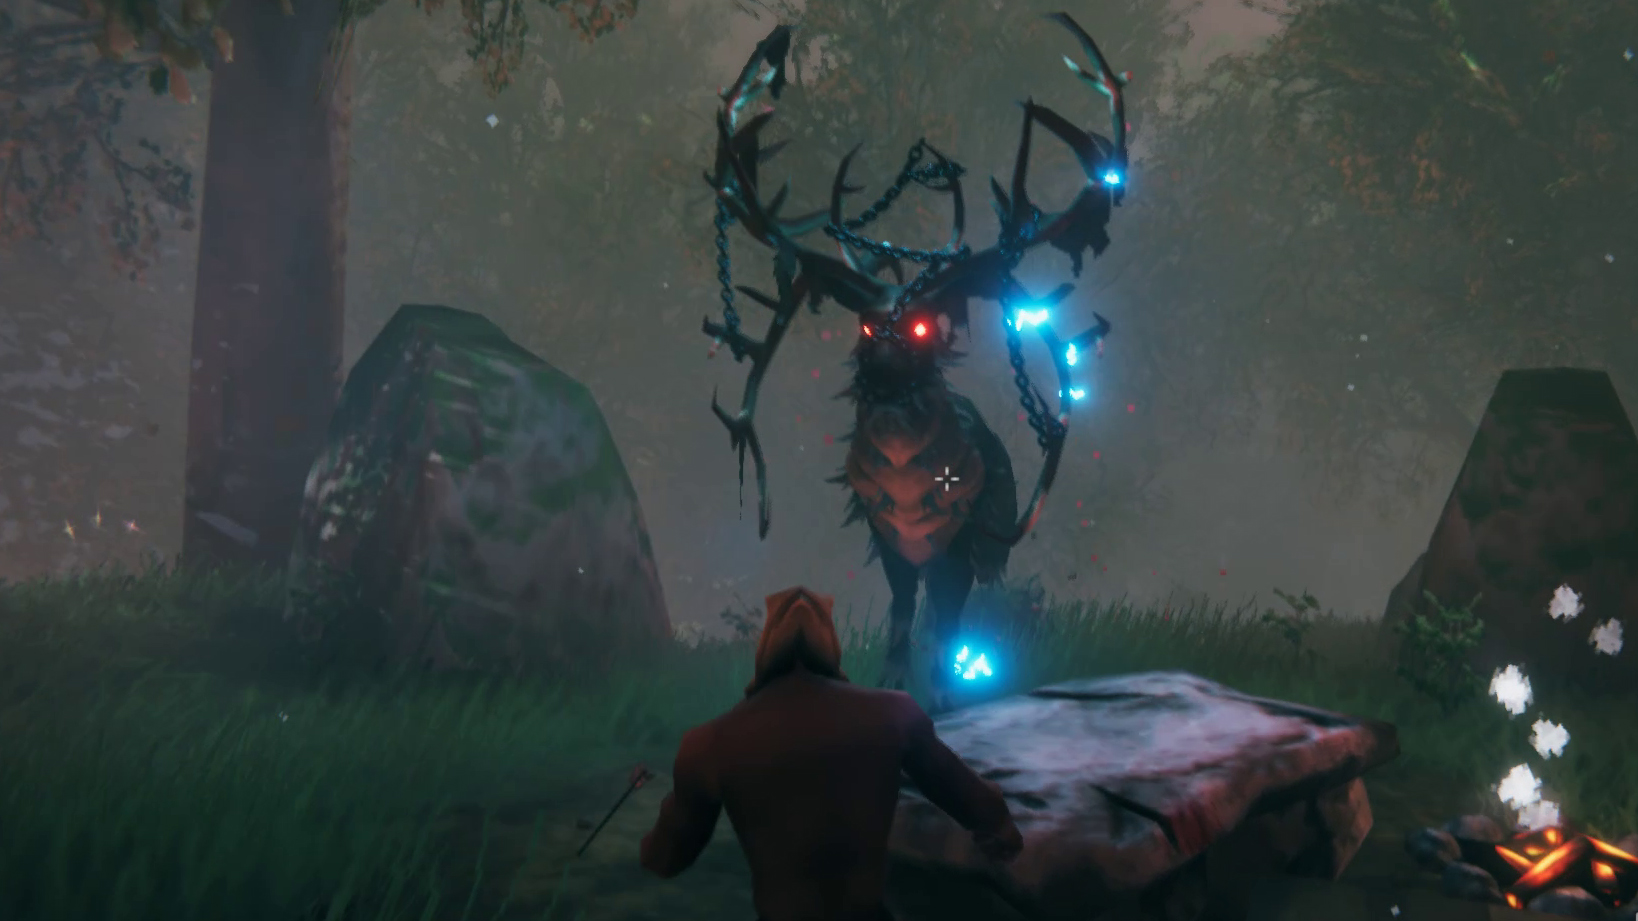
Unfortunately you can't just live an idyllic life and progress through the crafting levels without taking on Valheim's boss monsters from time to time. In fact, a basic crafting item, the pickaxe, is locked until you defeat the first boss, Eikthyr, a mighty stag.
You can summon Eikthyr by placing two deer trophies (found by hunting deer) on his altar, which you'll find early on. Just make sure you're ready for the fight by crafting some basic clothing (tunic, pants, and helmet if possible) and making sure your weapons are in good shape. Make sure you've got a shield, too.
Eikthyr has a lot of HP, but despite his size, even a small shield can effectively block his attacks. Just be patient, block when he charges or rears up, and dodge or strafe around to get in a few hits on his flanks before he runs away. And don't tangle with him near your base or he'll smash the hell out of it! It might take time, but you'll whittle him down. Collecting his antlers will unlock the recipe for the pickaxe, which will let you mine stone and ores.
8. There's (currently) no way to increase your inventory size
You don't have a whole lot of free inventory slots on your character. All the tools and weapons you'll be using will fill up your hotbar, and clothing like helmets, tunics, pants, and capes will also each take up a precious slot. When you set out into the world your inventory will fill up quickly.
The bad news is, there's no way to increase your inventory, at least not yet. Valheim is in Early Access, so hopefully we'll be able to craft pouches or sacks or something in the future so we can carry more stuff with us. In the meantime, craft some extra storage crates in your home and dump what you don't need to bring with you.
9. For a fishing rod, you'll have to find the trader
Another item you can't just craft yourself—and this is a real shame—is a fishing rod. If you want to go fishing, you'll need to find a trader, a randomly spawning NPC you can find (or try to find) in the Black Forest.
The Black Forest is a biome you can find if you strike out from your starting biome in the center of the map (The Meadows). As you get further from the center, you'll eventually see a change in the environment: pine trees and fir trees, caves guarded by skeletons, and more greylings, trolls, and other monsters. It's much more dangerous than The Meadows, so be cautious.
And the trader is... well, somewhere in the Black Forest. Valheim's map is procedurally generated, and the trader can spawn in a number of different places so I can't give you a precise location. I personally haven't found him yet myself! But if you find get close, you'll see an icon on your minimap marking his location, and you can buy a fishing rod from him.
10. Hide the HUD with Ctrl+F3
Valheim may have some lo-fi, throwback looks, but it's still quite a beautiful game. If you want to take some epic screenshots without a bunch of UI cluttering things up, press Ctrl+F3 and start snapping pictures. Press it again to bring the HUD back.
Post a Comment